Pages

Sunday, December 30, 2012

SOLID principle in OOP programming

http://en.wikipedia.org/wiki/SOLID_(object-oriented_design)

  • Single responsibility principle (SRP)
    • An object should have only a single responsibility.
  • Open/closed principle (OCP)
    • Software entitles … should be open for extension, but closed for modification.
  • Liskov substitution principle (LSP)
    • Objects in a program should be replaceable with instance of their subtypes without altering the correctness of that program.
  • Interface segregation principle (ISP)
    • Many client specific interfaces are better one general purpose interface
  • Dependency inversion principle (DIP
    • Do not depend upon concretions. One should depend upon abstraction.

Closure in Java using Anonymous Inner Class - example

Java doesn't support closure, but using Anonymous Inner Class, we can experience closure in Java.

Here is the code.
class Action {
	public void doAction() {
		System.out.println("Hello, world");
	}
}

class A {
	public void doStuff(Action a)
	{
		a.doAction();
	}
    public void method() {
        final int i = 0;

        doStuff(new Action() {
            public void doAction() {
                System.out.println(i);   // or whatever
            }
        });
    }
}

class Closure {
	public static void main(String[] args) {
		new A().method();
	}
}
You should be careful that the local variable in the method() method should be final in order to prevent this error message.

Closure.java:17: error: local variable i is accessed from within inner class; needs to be declared final System.out.println(i); // or whatever ^ 1 error

Instead of giving closure function to doStuff() method, anonymous inner class is given. In its implementation, doStuff() uses methods in A class as if it's closure functions. You can give different code block to doStuff() if necessary.

Compared to python example or lisp example, Java needs full support closure support to make the code simpler and easier to read.

References

Closure in Lisp - example

This is a code that I borrowed from the book Practical Common Lips for closure in Lisp.
(defun artist-selector (artist)
  #'(lambda (cd) (equal (gets cd :artist) artist)))
In the code, artist-selector returns a closure that closes a variable "artist" over it. We can use this closure as a parameter to "select" function. Lisp supports high order function decades ago to enable it possible. "*db*" is a global variable.
(defun select (selector-fn)
  (remove-if-not selector-fn *db*))
The usage of "select" method is as follows. You can create another closure with different parameter to the "artist-selector" function.
(select (artist-selector "Dixie Chicks"))

References

Closure in Python - example

Closure is a "function (code block)" with a "referencing environment". I interpret it as a function pointer with free variables. In Python terms, a variable defined in an enclosing function is a free variable inside any nested functions.
In this example, printer is a closure as it points to a code block with a free variable of "msg". The variable msg is closed over the printer() function.
def make_printer(msg):
    def printer():
        print msg
    return printer

printer = make_printer('Foo!')
printer()
This printer method is not a closure but nested function, as in this case "msg" variable is nothing but a local variable that is not "closed".
def make_printer(msg):
    def printer(msg=msg):
        print msg
    return printer

printer = make_printer("Foo!")
printer() # "Foo!"
printer("Hello") # --> "Hello"

References

Polymorphism in OOP

Polymorphism in OOP is the ability of objects belonging to different types to respond to method, filed, or property calls of the same name. The caller doesn't have to know the type of the callee so that the exact behavior is determined at run-time.

For strong type languages, polymorphism usually means that type A derives from type B or C, In weakly typed languages types are implicitly polymorphic: duck typing allows polymorphism without inheritance.

There are some disputes whether overloading and overriding is a part of polymorphism.
  • Wikipedia explains they are not the same. (Polymorphism is not the same as method overloading or method overriding.1 Polymorphism is only concerned with the application of specific implementations to an interface or a more generic base class.)
  • Some of OOP books explain "method overloading" as an example of polymorphism.
  • This paper explains overloading as a part of polymorphism
  • This post explains that overriding is a part of polymorphism, whereas overloading is not.

Generic programming is also known as "parametric polymorphism".

References

  1. Polymorphism in object-oriented programming
  2. OBJECT.__class__ is CLASS and "isinstance(OBJECT, CLASS)" for polymorphism in python
  3. Duck typing
  4. Function overloading
  5. Method Overriding
  6. Is Method Overloading considered polymorphism?
  7. Polymorphism vs Overriding vs Overloading

OBJECT.__class__ is CLASS and "isinstance(OBJECT, CLASS)" for polymorphism in python

The "is" operator in Python compares the two values before and after to check if they point to the same object. Whereass the "is instance" checks if the first parameter (object) is an instance of the second parameter(class).
As a result "dog.__class__ is Animal" returns False, "isinstance(dog, Animal)" returns True.
class Animal:
    pass
    
class Dog (Animal):
    pass
    
dog = Dog()

print dog.__class__ is Animal
print isinstance(dog, Animal)
False True

Things to consider

For C# programmer, this is confusing as "is" operator in C# works as "ins instance" of Python.
In python idiom, you are not encouraged to use type-checking, instead use duck typing instead. In short, you just execute if an object can quack or not instead of checking an object is an instance of a duct that quacks.
class Duck(object): 
    def quack(self):
        print "QUACK!!!"

class DonaldDuck(object): 
    def quack(self):
        print "quack!"


def canQuack(duckType):
    duckType.quack()


duck = Duck()
donaldDuck = DonaldDuck()
canQuack(duck)
canQuack(donaldDuck)

References

How does polymorphism work in Python?

XML file generation using Python's ElementTree

Introduction

When we want to generate XML file from whatever python data structure, ElementTree might be the easiest solution. For example, when we want to transform a list of list . pairList = [ ["A.txt", "B.txt"] … ] into XML format. <root>
<node fileA="A.txt" fileB="B.txt" />
<node ... />
</root>
</code>

Code

We can implement the code as follows.
import xml.etree.ElementTree as ET

root = ET.Element('root')
for pairs in self.pairList:
    #print pairs
    testa = pairs[0]
    testb = pairs[1]
            
    child = ET.Element('node')
    child.attrib['fileA'] = testa
    child.attrib['fileB'] = testb
    root.append(child)
            
file = open(filePath, 'w')

#Create an ElementTree object from the root element
ET.ElementTree(root).write(file)

Explanations

The API names of ElementTree is pretty straightforward. For getting (or creating) an element, you need to use xml.etree.ElementTree.Element (ET.Element when you import with the name ET) API the tag name as a parameter. When you make the element, you can just append (it's also the API name python uses) the newly generated element as a children of the parent element.

You just keep creating the hierarchy using ET.Element() static and append() API.

The element has "attrib" dictionary to store the attributes of the node.

For writing the result into an XML file, you select the root, and use the write method to print out the XML.

Reference

  1. Python ElementTree XML Tutorial
  2. Processing XML in Python with ElementTree

Monday, December 10, 2012

Adding a new blogspot from MarsEdit.

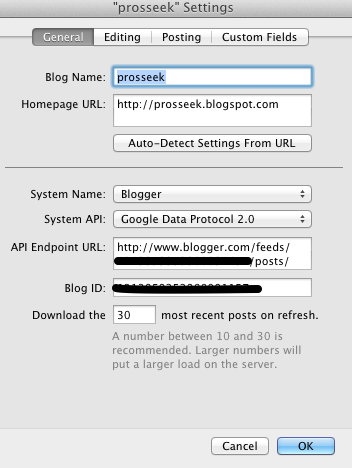
When you want to setup a new blog connection between blogspot and MarsEdit, this is how you can do it.

The basic idea is to make a setting from MarsEdit as follows:

Screenshot12%25253A10%25253A1212%25253A22PM-2-2012-12-10-12-23.png

Procedure

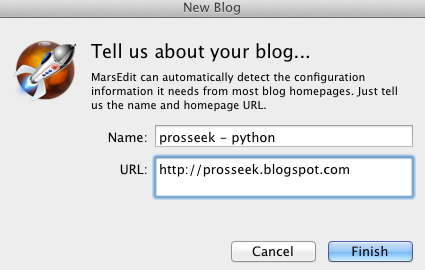
You start from “New Blog”.

PastedGraphic13-2012-12-10-12-23.png

Then, you are requested to add google account that relates to the bloodspot.

PastedGraphic14-2012-12-10-12-23.png

And that’s it. It automatically gets all the blogs from the blogger so that you can update or add some more.

git ignore using Tower.

Click the right button on the file you want to ignore.

ScreenShot2012-12-10at11.52.55AM-2-2012-12-10-11-53.png

You need to check “Only ignore locally”. It makes the change in .git/info/exclude file.

PastedGraphic9-2012-12-10-11-53.png

PastedGraphic10-2012-12-10-11-53.png

See the file is added.

PastedGraphic11-2012-12-10-11-53.png

The other option is storing the ignore files in .gitignore.

PastedGraphic12-2012-12-10-11-53.png

In this case, the ~/.gitignore file is updated to reflect the changes.

Symbolic link and alias in Mac.

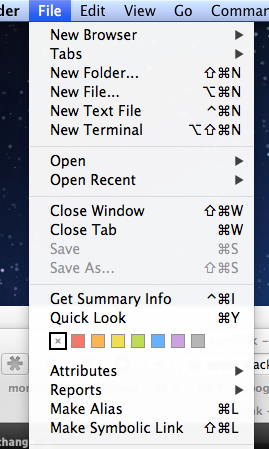
In Mac OS X, you have two choices when you want to have a file that has a link to an exisiting file: alias (Command L), and symbolic link (Shift-Command L).

PastedGraphic-2012-12-10-10-25.png

Command line tools can understand a symbolic link, not an alias. For GUI tools, e.g., PathFinder, both an alias and symbolic link will work. Automator, however, works only with alias. It’s understandable because link is a legacy from UNIX; so is command line tools. Likewise Automator is a legacy from Mac; so is an alias.

You’ll notice that alias link is larger, which means has more information. An alias has two pieces of information: UID of the file that it links to, and the physical path and file name that it links to. As a result alias will understand the changes you make to the original file.

A symbolic link doesn’t contain the UID. As a result symbolic link will be shown as broken when you change the name of the file that it links to.

Demo

  1. Using “command-L”, I create an Alias. PastedGraphic1-2012-12-10-10-25.png
  2. Rename the progress directory as “progress_update”. PastedGraphic2-2012-12-10-10-25.png
  3. Click the “progress_update” to check Path Finder finds the linked directory correctly. PastedGraphic3-2012-12-10-10-25.png

And this is an example for symbolic link.

  1. Using “Shift-Command-L”, I create a symbolic link. PastedGraphic4-2012-12-10-10-25.png
  2. Change directory name. PastedGraphic5-2012-12-10-10-25.png
  3. Check Path Finder finds the link OK. PastedGraphic6-2012-12-10-10-25.png

For the command line tools, the alias is just a file (color in black), however the symbolic link is recognizable (color in pink).

PastedGraphic7-2012-12-10-10-25.png

And you can use command line tools for the change.

PastedGraphic8-2012-12-10-10-25.png

In short

  • Use symbolic link when you want to use command line tools, for example when you want to use Linux to login your mac account.
  • Use alias when you work with your mac, as it will understand your changes.

References

Sunday, December 9, 2012

Headless RCP - with many plugins

Introduction

This is the 3rd blog for making standalone headless RCP. For the other two blogs check the references.

In this blog, we are going to show what is needed for an application that depends on other plugins. For the example, we use JDT and LTK, and show to how to implement a rename refactoring tool.

Procedure

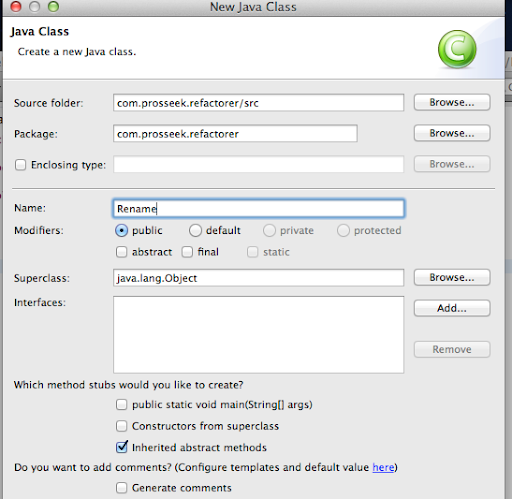
Add source code

PastedGraphic41-2012-12-9-20-15.png

You’ll have a lot of errors when you don’t set up the dependencies correctly.

PastedGraphic42-2012-12-9-20-15.png

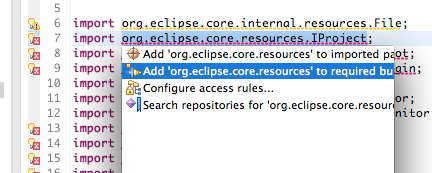
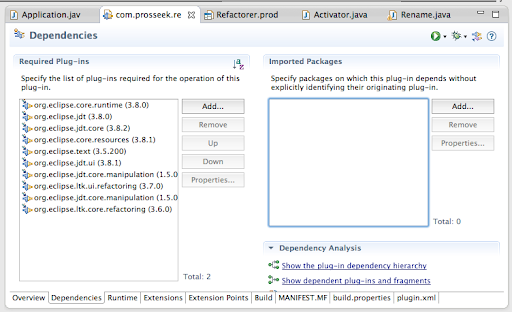
Using Quick help, you can add required plugins.

PastedGraphic44-2012-12-9-20-15.png

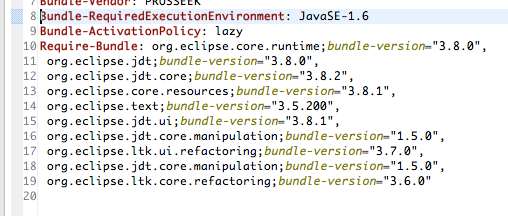
You see the plugin is added in MANIFEST.

PastedGraphic45-2012-12-9-20-15.png

However, the simplest way is to add the dependences in MANIFEST.MF.

PastedGraphic43-2012-12-9-20-15.png

PastedGraphic48-2012-12-9-20-15.png

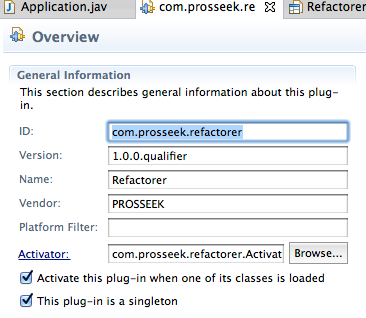
Don’t forget to set the singleton flag.

PastedGraphic46-2012-12-9-20-15.png

PastedGraphic47-2012-12-9-20-15.png

Run Configurations

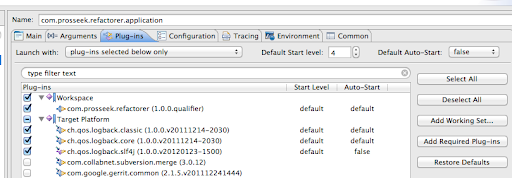
You need to execute run configuration to click the “Add Required Plug-ins” button for both application and product.

PastedGraphic49-2012-12-9-20-15.png

Update the product

Go to the product configuration and update using “Add Required Plug-ins”

PastedGraphic50-2012-12-9-20-15.png

References

Headless RCP - standalone

Introduction

We have another blog on making a headless RCP (Headless RCP - simple). In this article, we make the program into a standalone desktop RCP application.

Procedure

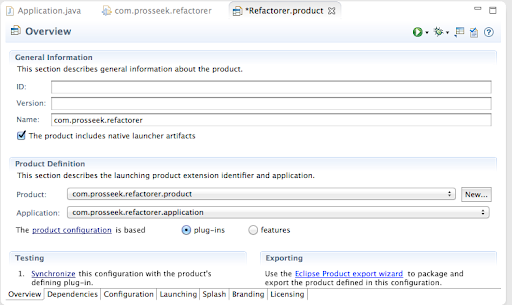
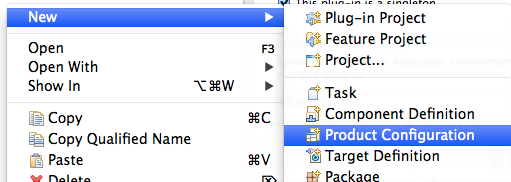
You need to make a “Product Configuration”.
PastedGraphic18-2012-12-9-19-37.png

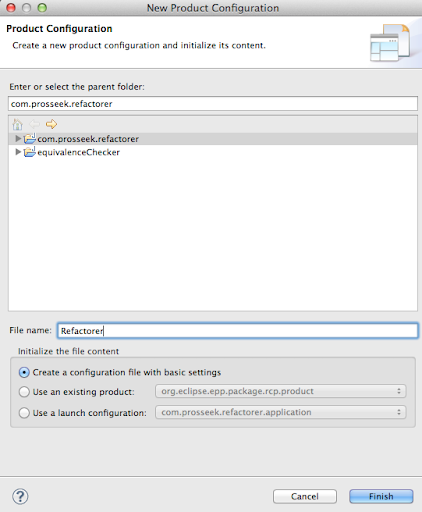
Select the application that we created before.
PastedGraphic20-2012-12-9-19-37.png

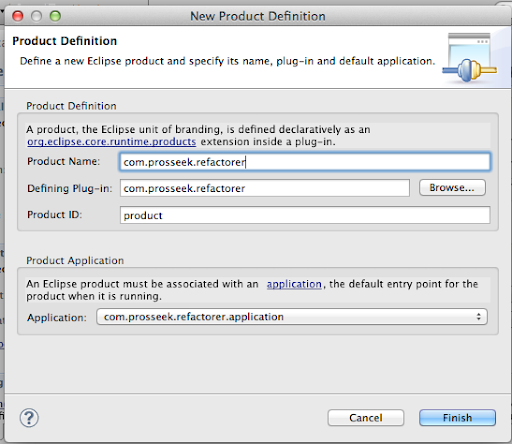
Setting the “Product Definition”.

PastedGraphic21-2012-12-9-19-37.png

Don’t setup anything in ID.

PastedGraphic22-2012-12-9-19-37.png

Update the MANIFEST.MF

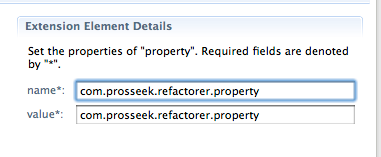
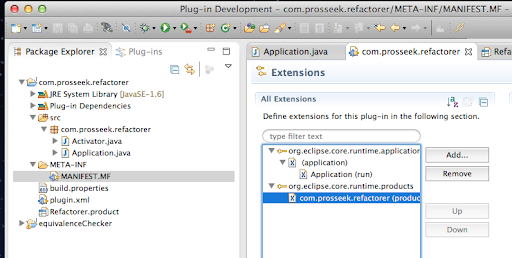
Go to MANIFEST.MF, and you’ll see you already have an extension. Add property.
PastedGraphic23-2012-12-9-19-37.png

PastedGraphic24-2012-12-9-19-37.png

PastedGraphic25-2012-12-9-19-37.png

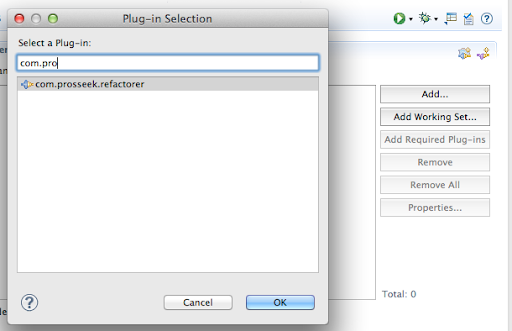
In Dependencies, you have to add the application you just created.
PastedGraphic27-2012-12-9-19-37.png

Then click “Add Required Plug-ins”.

PastedGraphic28-2012-12-9-19-37.png

You’ll see all the required plugins are added.
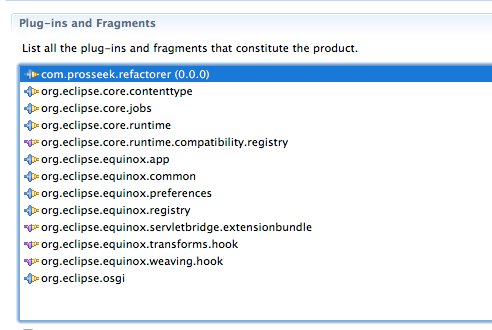
PastedGraphic29-2012-12-9-19-37.png

Click synchronize to check everything is OK.

PastedGraphic26-2012-12-9-19-37.png

And then, you need to add all “.” and all the namespaces additional to your exported one in the “Runtime/Classpath”. Without this configuration you’ll have errors when you launch the standalone program even when your program works fine within the eclipse IDE.
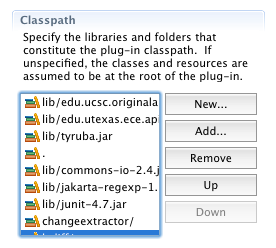
PastedGraphic2-2012-12-9-19-37.png

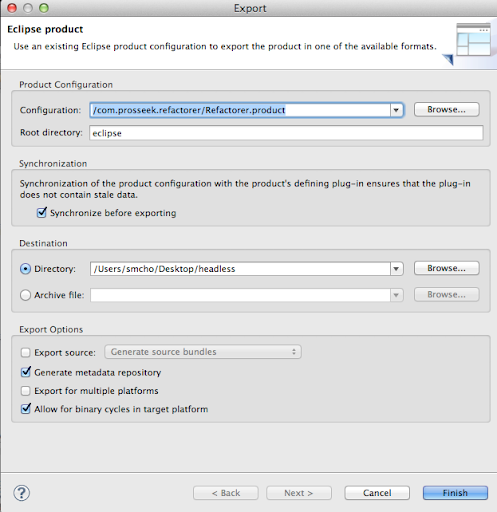
Exporting the headless RCP

PastedGraphic34-2012-12-9-19-37.png

PastedGraphic30-2012-12-9-19-37.png

PastedGraphic31-2012-12-9-19-37.png

You’ll see that the standalone headless RCP is created in the directory you specified.
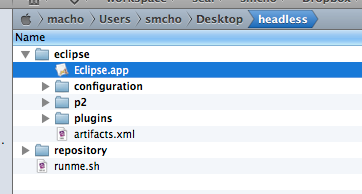
PastedGraphic32-2012-12-9-19-37.png

Executing standalone headless RCP

For execution, you can run “/DIRECTORY_TO_THE_RCP/Eclipse.app/Contents/MacOS/eclipse -data WORK_SPACE -clean”. You can make the shell script. Check that it also has the “-clean” parameter.

PastedGraphic33-2012-12-9-19-37.png

Run Configuration

You can create a run configuration so that you can launch the product within eclipse IDE.
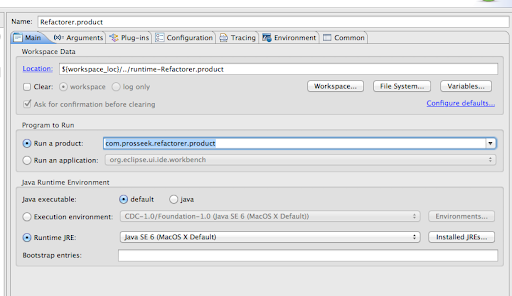
PastedGraphic35-2012-12-9-19-37.png

Add -clean parameter.

PastedGraphic36-2012-12-9-19-37.png

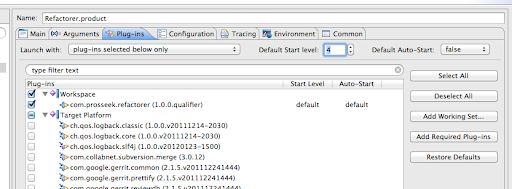
Add “Required Plug-ins”

PastedGraphic37-2012-12-9-19-37.png

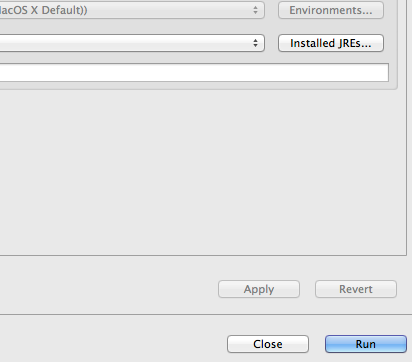
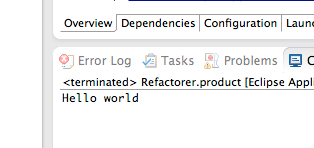
You can run to get the same result.

PastedGraphic39-2012-12-9-19-37.png

PastedGraphic38-2012-12-9-19-37.png

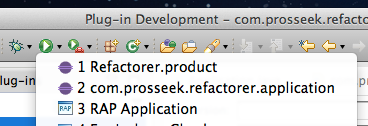
After the first launch, you have the product in the run button.
PastedGraphic40-2012-12-9-19-37.png

Issues and solutions

  • It worked fine, but when you do something more and you suddenly have an error, the first thing you need to check is “Run Configurations”, then “Add Required Plug-ins”, PastedGraphic1-2012-12-9-19-37.png
  • Not found Activator
    • You may have “org.osgi.framework.BundleException: The activator ABC.Activator for bundle ABC.refactorer is invalid” error when you launch the standalone binary. In that case, add “.” in the runtime class path.PastedGraphic-2012-12-9-19-37.png

References