Pages

Friday, November 30, 2012

Building eclipse source base and resolving its related issues

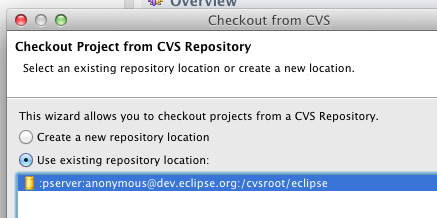
1. Download the eclipse source from CVS

You have to Checkout project from CVS Repository, refer to http://wiki.eclipse.org/CVS_Howto

ScreenShot2012-11-30at2.54.33PM-2012-11-30-14-53.png

Based on your workspace, you’ll have e4 directory that has many eclipse projects.

ScreenShot2012-11-30at3.00.13PM-2012-11-30-14-53.png

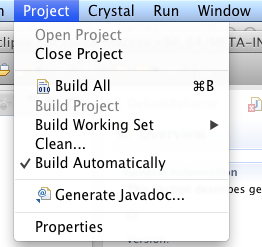
It’ll start building when you setup automatic build.

PastedGraphic1-2012-11-30-14-53.png

PastedGraphic-2012-11-30-14-53.png

2. Removing “API Baselines error”

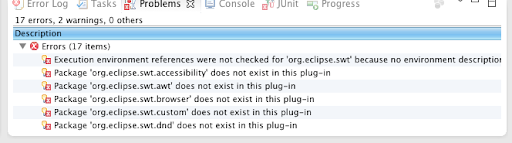
After the automatic build, you may see a lot of “red !” and “red X” marks in some of the projects.

Refer to http://stackoverflow.com/questions/13650375/the-red-mark-after-the-build-in-eclipse. For your conveniences in debugging, you need to setup the filter. http://stackoverflow.com/a/13651021/260127

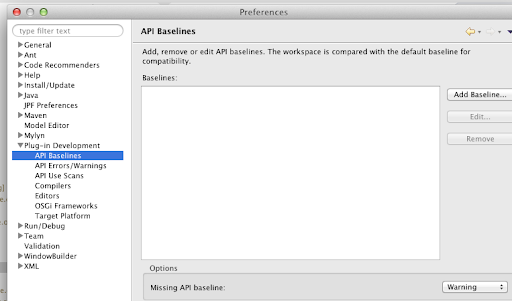
You’ll have “Adding API Baseline in eclipse” error.

http://stackoverflow.com/questions/13651144/adding-api-baseline-in-eclipse

You can remove all the errors by making “Missing API baseline” as warning.

PastedGraphic4-2012-11-30-14-53.png

3. Removing “Build path specifies execution environment J2SE-1.4” error

You may see “Build path specifies execution environment J2SE-1.4.” error in Mac OS X, it’s because some of the projects use JDK1.4, but the setup in the Mac is wrong.

http://stackoverflow.com/questions/13652032/build-path-specifies-execution-environment-j2se-1-4-error-in-eclipse

ScreenShot2012-11-30at1.35.53PM-2012-11-30-14-53.png

ScreenShot2012-11-30at2.32.59PM-2012-11-30-14-53.png

In eclipse Preference, you need to add Compatible JREs.

ScreenShot2012-11-30at12.46.32PM-2012-11-30-14-53.png

Check if you have Java SE correctly installed.

ScreenShot2012-11-30at1.39.46PM-2012-11-30-14-53.png

Then find all the projects with the “Build path specifies execution environment J2SE-1.4.” error.

PastedGraphic3-2012-11-30-14-53.png

Open the “Configure File Path”.

PastedGraphic2-2012-11-30-14-53.png

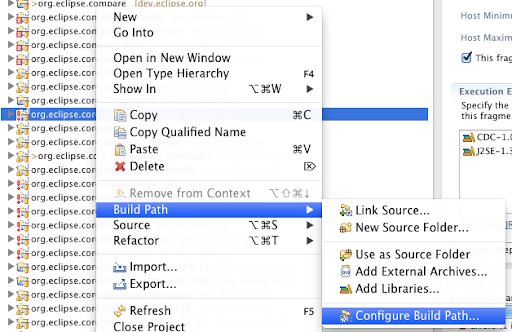
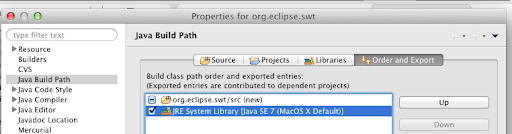
Replace the JRE System Library

ScreenShot2012-11-30at2.07.19PM-2012-11-30-14-53.png

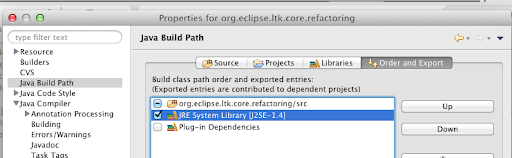
with the one with you just setup.

ScreenShot2012-11-30at2.32.20PM-2012-11-30-14-53.png

Install Execution Environment Descriptor

http://stackoverflow.com/questions/13655635/installing-environment-descriptions-in-eclipse/13663453#13663453

Monday, November 12, 2012

Program equivalence

$latex P$ is valid precisely when $latex \neg P$ is not satisfiable. In other words, if it is not possible to make $latex \neg P$ false, then $latex P$ is valid.

To make program equivalence checking with $latex P$ and $latex Q$ ($latex P \leftrightarrow Q$), you need to check $latex \neg (P \to Q)$ and $latex \neg (Q \to P)$ both not satisfiable.

$latex \neg (P \to Q)$ is $latex P \wedge \neg Q$, and let's say $latex P$ and $latex Q$ are decomposed into two symbolic summary elements such as $latex P_1 \lor P_2 $ and $latex Q_1 \lor Q_2 $. $latex P \wedge \neg Q$ becomes unsatisfiable only when $latex (P_1 = Q_1) \wedge (P_2 = Q_2)$.

Thursday, November 8, 2012

Data types in python

You can use "isinstance" method to check the data type.

You can use "str" and "int" as a method to data type changes.
strint = "32"
if isinstance(strint, str):
    print "String"
    print int(strint)
    
x = 10    
print str(x)
print `x`
print "%d" % x

print int('10')
String
32
10
10
10
10

Iterator in python

You can make any class in a python utterable using iterator.
class IterTest:
    def __init__(self, itemList):
        self.itemList = itemList
        self.reset()

    def __iter__(self):
        return self
        
    def next(self):
        try:
            result = self.itemList[self.index]
        except IndexError:
            raise StopIteration
        self.index += 1
        return result       
        
    def reset(self):
        self.index = 0
        
        
if __name__ == "__main__":
    iterTest = IterTest([[1,3], [2,4]])
    for item in iterTest:
        print item
        
    iterTest.reset()
    for item in iterTest:
        print item      

References

python map and filter

Python's functional programming has two important method - map and filter. map has an input of a list, and iterates over the elements by applying a method.

filter uses the method given to filter out the elements that returns true when applying the method.

This is an example.
pair = \
[
{'group': 'b', 'method': 'test'},
{'group': 'a', 'method': 'test'}
]

print map(lambda x: x['group'] == 'a', pair)
print filter(lambda x: x['group'] == 'a', pair)
This is the result.
[False, True]
[{'group': 'a', 'method': 'test'}]

NULL check in SQLite

When you want to select only the data where comment is not null, you can use this command.
SELECT * from timeobject where comment != ""; 

References

http://stackoverflow.com/questions/7519621/where-is-null-not-working-in-sqlite

string concat with php

You can use dot for concatenating strings.

References

http://php.net/manual/en/language.operators.string.php

Sunday, November 4, 2012

pprint in python

http://stackoverflow.com/questions/521532/how-do-i-get-pythons-pprint-to-return-a-string-instead-of-printing http://docs.python.org/2/library/pprint.html

javac -d option

Using "-d" option, you can create a class in a hierarchical directory. "HelloA.java" has "package a.b", with the "-d" option, the class is generated in "testa/build/a/b" directory.
javac -d testa/build -g testa/src/a/b/HelloA.java 
java -cp testa/build a.b.HelloA

Python format string

When using template technique for formatting string, STRING#format can be useful.
print 'Coordinates: {latitude}, {longitude}'.format(latitude='37.24N', longitude='-115.81W')
Coordinates: 37.24N, -115.81W

References

pydoc

You can get all the installed module information using "python modules".
pydoc modules

...
AddressBook         __future__          django              pstats
AppKit              _abcoll             dl                  pty
AppleScriptKit      _ast                doctest             pwd
AppleScriptObjC     _bisect             dumbdbm             py2app
Audio_mac           _builtinSuites      dummy_thread        py2app_tests
Automator           _codecs             dummy_threading     py_compile
BaseHTTPServer      _codecs_cn          easy_install        pyclbr
Bastion             _codecs_hk          email               pydoc
CFNetwork           _codecs_iso2022     encodings           pydoc_data
CFOpenDirectory     _codecs_jp          errno               pyexpat
CGIHTTPServer       _codecs_kr          exceptions          quopri
CalendarStore       _codecs_tw          fcntl               random
Canvas              _collections        filecmp             re
...
pydoc doesn't recognize any special markups. If you want to get more from the docstring, you need other documentation generator such as epydoc, Doxygen, or Sphinx.

References

Using markdown format with TextMate

You want to execute "pandoc" when "⌘-R" is clicked, what would you do? There are some ideas you need to understand.
  • Scope selection
  • Activation
  • Command
  • Environment Variables

Scope selection and Activation

Many of the keys are already assigned, so when you try to use the popular key such as "⌘-R", you need to select the scope. In other words, you need to teach TextMate that when you click "⌘-R" in markdown, it means something special. Screen Shot 2012 11 04 at 2 56 11 PM

Command

In command editor, you can give any UNIX command you want. And many of the predefined environment variables are already given.

Combining the command and variable, you can come up wit the following commands.
/usr/local/bin/pandoc "$TM_FILEPATH" -o "$TM_FILEPATH".html
/usr/bin/open "$TM_FILEPATH".html
echo File: "$TM_FILEPATH"
Screen Shot 2012 11 04 at 3 02 07 PM

References

python logging

Python logging lets the information is shown to the screen, or written to a file. Without any file setup, the default action is to print out the info to the screen.

You have three levels of logging: debug > info > warning. The strongest level is debug, and the weakest is warning.
import logging

logging.warning('Watch out!') # will print a message to the console
logging.info('I told you so') # will not print anything
You can use "basicConfig()" method to login the info to the file. For level, if you choose "DEBUG", every debug/info/warning message is logged, with "INFO", only info/waring, and so on.
import logging
logging.basicConfig(filename='example.log',level=logging.DEBUG)

logging.debug('This message should go to the log file')
logging.info('So should this')
logging.warning('And this, too')

References

Documentation in python

def foo():
    """A multi-line
    docstring.
    """

def bar():
    """
    A multi-line
    docstring.
    """

References

Saturday, November 3, 2012

Making Symbolic Path Finder standalone

Setup

In order to use JPF/SPF, one needs a setup file in "~/.jpf/site.properties" file. This setup file is a pointer that points where all the core files and extensions are located.
# JPF site configuration
user.home = DIRECTORY
jpf.home = ${user.home}/DIR1
jpf.libraries = DIR2

# can only expand system properties
jpf-core = ${jpf.libraries}/jpf-core

jpf-symbc = ${jpf.libraries}/jpf-symbc
extensions+=,${jpf-symbc}
The pointed directory has another "jpf.proterites" configuration files. Screen Shot 2012 11 03 at 11 32 06 PM Inside the file, we have all the directory information that points to the jar file and others.
...

jpf-core = ${config_path}

jpf-core.native_classpath=\
  ${jpf-core}/build/jpf.jar;\
  ${jpf-core}/build/jpf-annotations.jar;\
  ${jpf-core}/lib/junit-4.10.jar

jpf-core.classpath=\
  ${jpf-core}/build/jpf-classes.jar;\
  ${jpf-core}/build/examples

jpf-core.sourcepath=\
  ${jpf-core}/src/examples

jpf-core.test_classpath=\
  ${jpf-core}/build/tests

jpf-core.peer_packages = gov.nasa.jpf.jvm,,

...

Java code with package

This is the sample code.
package a.b;

public class HelloA {
	public int testRefactored (int refs, int flags) {
	    if (flags != 0) 
	    	return flags;
	    else if (refs != 0)
	    	return refs;
	    return 10;       
	  }
	
	public static void main(String[] args) {
		HelloA ex = new HelloA();
		int ret = ex.testRefactored(0,0);
		System.out.print(ret);
	}
}
We need to compile this java code using debug flag "-g", and move the generated class file where the java can find it.
javac -g HelloA.java
mkdir -p a/b
Then, we need the setup file. In this setup file, one needs to specify the listener. In this listener example, it specifies the listener class, and it should be located in somewhere where the "site.properties" can point to.
target = a.b.HelloA

basedir = PATH
rse.testFile = ${basedir}/HelloA.txt
symbolic.method= a.b.HelloA.testRefactored(sym#sym)
rse.testCases = true

listener = gov.nasa.jpf.porting.listener.RSESymbolicListener

#If we don't set the bounds then one of the constraints times out.
symbolic.min_int=-100
symbolic.max_int=100
symbolic.min_double=-1000.0
symbolic.max_double=1000.0
symbolic.undefined=0
Then we can execute the JPF jar binary.
JPF_JAR_DIR=/Users/smcho/Dropbox/smcho/research/jpf/jpf-core/build
java -jar ${JPF_JAR_DIR}/RunJPF.jar ./HelloA.jpf 
Screen Shot 2012 11 03 at 11 52 14 PM This is an example to get two summary files to execute the software equivalence checker.
mkdir -p a/b
#
javac -g HelloA.java
mv HelloA.class a/b
#
JPF_JAR_DIR=/Users/smcho/Dropbox/smcho/research/jpf/jpf-core/build
java -jar ${JPF_JAR_DIR}/RunJPF.jar HelloA.jpf
#
mkdir -p c/d
#
javac -g HelloB.java
mv HelloB.class c/d

JPF_JAR_DIR=/Users/smcho/Dropbox/smcho/research/jpf/jpf-core/build
java -jar ${JPF_JAR_DIR}/RunJPF.jar HelloB.jpf

Java code with no package

With the java source without package, everything is the same except
  • No need to move the class file into the directory.
  • No need to prepend the package info in the configuration files.

Make software equivalence checker stand alone

The input

The input file format for equivalence checker is the output from Symbolic Path Finder.
testCase=test(-100,-100);pc=( !=  flags_2_SYMINT[-100] CONST_0);effects=RETURN==flags_2_SYMINT[-100];solverCalls=1;statementsExecuted=[];positionsExecuted=[];constraints=none
testCase=test(-100,-100);pc=( !=  refs_1_SYMINT[-100] CONST_0) && ( ==  flags_2_SYMINT[0] CONST_0);effects=RETURN==refs_1_SYMINT[-100];solverCalls=2;statementsExecuted=[];positionsExecuted=[];constraints=none
testCase=test(0,0);pc=( ==  refs_1_SYMINT[0] CONST_0) && ( ==  flags_2_SYMINT[0] CONST_0);effects=RETURN==10;solverCalls=2;statementsExecuted=[];positionsExecuted=[];constraints=none

The source code

Check the algorithm for the code.

After the compilation, you'll get some class files. As the code uses "jSMTLIB.jar", you also need this for execution. Screen Shot 2012 11 03 at 11 58 53 PM

Execution

This is the script with the class files.
java -cp \
.:jSMTLIB.jar:/Users/smcho/Dropbox/smcho/workspace/smcho/equivalenceChecker/bin \
EquivalenceChecker \
-r A.txt \
-t B.txt \
-m map.txt \
-e pe -s yices -p ./yices 
When you generate the executable jar, the code will be simpler.
java -cp \
.:jSMTLIB.jar \
-jar equivalenceChecker.jar \
-r A.txt \
-t B.txt \
-m map.txt \
-e pe -s yices -p ./yices 

XML parsing/generation with ElementTree

Parsing XML

Let's say we want to parse this XML code.
  • The XML has the root element of "data".
  • Inside the root element, we have "TestA".
  • Inside the "TestA" element, we have multiple "Source" elements.
  • The "Source" element has three attributes.


Maybe the most convenient way to parse this XML is using ElementTree with Python. You can get the root with getroot() method.
import xml.etree.ElementTree as ET

tree = ET.parse('setup.xml')
root = tree.getroot()
From the root (or any element object), you can get the element with find() method with the element name as parameter. You can get the element whatever you want likewise.

The interesting thing you notice is that the element object returns iterator that gives all the sub elements.

The element object also has the attrib dictionary that contains the attributes.
testA = root.find('TestA')
sources = testA.find('Source')

for source in testA: # testA returns all the sub elements. 
    print source.attrib
    print source.attrib['numberOfParams']
    print source.attrib['filePath']
    print source.attrib['method']
This is the result to run the script.
{'numberOfParams': '2', 'method': 'method', 'filePath': 'Charlie'}
2
Charlie
method

Generating XML

You can crete the Element object with Element() with name of the element as a parameter.
root = ET.Element('data')
With SubElement with first parameter as the element object, and the second as the element name, one can add sub elements. As element object has the attrib dictionary, by filling in the dictionary one can add attributes.
testChoice = ET.SubElement(root, 'TestA')
source = ET.SubElement(testChoice, 'Source')
source.attrib[key] = sourceInfo[key]
And to string method generates string, and you can just save the string into a file.
xml_str = ET.tostring(root)
with open("./hello.xml","w")  as f:
            f.write(xml_str)
For element object you can use the dump() method
ET.dump(root)
The code to generate the xml can be as follows:
import xml.etree.ElementTree as ET
import re

class Source:
    def __init__(self):
        self.method = "method"
        self.filePath = "filePath"
        self.numberOfParams = 2
        
    def buildSource(self, data, testChoice, **sourceInfo):
        testChoice = ET.SubElement(data, testChoice)
        source = ET.SubElement(testChoice, 'Source')
        for key in sourceInfo.keys():
            print key, sourceInfo[key]
            source.attrib[key] = sourceInfo[key]
        
    def buildXml(self):
        root = ET.Element('data')
        sourceInfo = {}
        sourceInfo['filePath'] = "Charlie"
        sourceInfo['numberOfParams'] = "%d" % 2
        sourceInfo['method'] = "method"
        self.buildSource(root, 'TestA', **sourceInfo)
        
        xml_str = ET.tostring(root)
        
        #root = ET.fromstring(xml_str)
        ET.dump(root)
        with open("./hello.xml","w")  as f:
            f.write(xml_str)

source = Source()
source.buildXml()